Raspberry Pi 上利用 Apache MXNet 建立一個即時物件分類系統
By Jason, Jul 16, 2017, in category Machine learning
By Jason, Jul 16, 2017, in category Machine learning
本文翻譯至 AWS AI Blog,目前花了大概一點時間翻譯,感覺不甚完美所以還保留對照文。如有錯誤還請指教。
業配文偶爾還是有值得欣賞之處呀。對於沒有太多設備的業餘玩家,Pi + AWS 不失為一個不錯的低成本方案!
再次澄清,我絕對沒有要幫 amazon 業配。但歡迎 amazon 來找我 XD。
過去五年裡,深度類神經網路已經解決了許多計算上困難的問題,特別是在計算機中的視覺領域。因為深度網路需要很大量的計算能力進行訓練,經常需要用到數十個 GPUs,許多人會誤認為只能在運行在強大的雲端伺服器。實際上訓練完成深度模型網路模型,只需要較少的電腦資源就能運作模型的預測。這代表你可以部署一個模型在一個非常低耗能 edge (非雲端) 裝置上且不需要依賴網路連接就能運行它。
進入 Apache MXNet,Amazon 的開源深度學習引擎之一,除了有效處理多 GPU 訓練和部署複雜的模型外,MXNet 可以產生非常輕量級的類神經網路模型的結構(譯者:參考類神經網路結構)。你可以在有限記憶體與運算的裝置上部署這些結構。這可以讓 MXNet 完美的在裝置上運作深度學習模型像是目前流行的 Raspberry Pi 電腦(僅需 $35 美金)
在這篇文章,我們將會帶大家瞭解如何針對 Raspberry Pi 建立一個使用 MXNet 的計算機視覺系統。我們可以展示如何使用 AWS IoT 去連結 AWS Cloud。運行一個即時物件辨認在 Pi 上時,這允許你使用這個雲端去管理一個輕量級的卷積神蹟網路(convolutional neural network) 。
接著你需要一個 Raspberry Pi 3 Model B 一張用來運行 Jessie 或是最新版本的 Raspbian 作業系統,Raspberry Pi Camera 模組 v2,與一個 AWS 帳戶。
第一件事,你可以設定 Pi 的照相模組並將其轉成攝影機,接著安裝 MXNet。這樣就能允許任何 Pi “所見” 開始運行基於深層神經網路分析。
設定 Pi 上的相機模組並連接裝置到網際網路,透過乙太網路或是 WiFi,接著打開終端機和鍵入指令來安裝 Python dependencies 如下:
sudo apt-get update
sudo apt-get install python-pip python-opencv python-scipy \
python-picamera
按照裝置文件說明 使用對應的 Python 綁定並編譯用於 Pi 上的 MXNet。對這份教學,你不需要使用 OpenCV 來編譯 MXNet。

在你的 Pi 的終端機打開 Python 2.7 Read-Eval-Print-Loop (REPL) 並且打入以下指令來驗證是否成功編譯:
python
>>> import mxnet as mx
>>> mx.__version__
對 Pi camera 抓的圖像運行預測,你需要從 MXNet Model Zoo 取得一個預訓練的深層網路模型。在 Pi 的家目錄建立一個 Python 檔案並且撰寫一個用來從模型庫下載 ImageNet-trained 模型的類別接著載入 MXNet 到 Pi 上:
# load_model.py
import mxnet as mx
import numpy as np
import picamera
import cv2, os, urllib2, argparse, time
from collections import namedtuple
Batch = namedtuple('Batch', ['data'])


class ImagenetModel(object):

    """
    Loads a pre-trained model locally or from an external URL and returns an MXNet graph that is ready for prediction
    """
    def __init__(self, synset_path, network_prefix, params_url=None, symbol_url=None, synset_url=None, context=mx.cpu(), label_names=['prob_label'], input_shapes=[('data', (1,3,224,224))]):

        # Download the symbol set and network if URLs are provided
        if params_url is not None:
            print "fetching params from "+params_url
            fetched_file = urllib2.urlopen(params_url)
            with open(network_prefix+"-0000.params",'wb') as output:
                output.write(fetched_file.read())

        if symbol_url is not None:
            print "fetching symbols from "+symbol_url
            fetched_file = urllib2.urlopen(symbol_url)
            with open(network_prefix+"-symbol.json",'wb') as output:
                output.write(fetched_file.read())

        if synset_url is not None:
            print "fetching synset from "+synset_url
            fetched_file = urllib2.urlopen(synset_url)
            with open(synset_path,'wb') as output:
                output.write(fetched_file.read())

        # Load the symbols for the networks
        with open(synset_path, 'r') as f:
            self.synsets = [l.rstrip() for l in f]

        # Load the network parameters from default epoch 0
        sym, arg_params, aux_params = mx.model.load_checkpoint(network_prefix, 0)

        # Load the network into an MXNet module and bind the corresponding parameters
        self.mod = mx.mod.Module(symbol=sym, label_names=label_names, context=context)
        self.mod.bind(for_training=False, data_shapes= input_shapes)
        self.mod.set_params(arg_params, aux_params)
        self.camera = None

    """
    Takes in an image, reshapes it, and runs it through the loaded MXNet graph for inference returning the N top labels from the softmax
    """
    def predict_from_file(self, filename, reshape=(224, 224), N=5):

        topN = []

        # Switch RGB to BGR format (which ImageNet networks take)
        img = cv2.cvtColor(cv2.imread(filename), cv2.COLOR_BGR2RGB)
        if img is None:
            return topN

        # Resize image to fit network input
        img = cv2.resize(img, reshape)
        img = np.swapaxes(img, 0, 2)
        img = np.swapaxes(img, 1, 2)
        img = img[np.newaxis, :]

        # Run forward on the image
        self.mod.forward(Batch([mx.nd.array(img)]))
        prob = self.mod.get_outputs()[0].asnumpy()
        prob = np.squeeze(prob)

        # Extract the top N predictions from the softmax output
        a = np.argsort(prob)[::-1]
        for i in a[0:N]:
            print('probability=%f, class=%s' %(prob[i], self.synsets[i]))
            topN.append((prob[i], self.synsets[i]))
        return topN

    """
    Captures an image from the PiCamera, then sends it for prediction
    """
    def predict_from_cam(self, capfile='cap.jpg', reshape=(224, 224), N=5):
        if self.camera is None:
            self.camera = picamera.PiCamera()

        # Show quick preview of what's being captured
        self.camera.start_preview()
        time.sleep(3)
        self.camera.capture(capfile)
        self.camera.stop_preview()

        return self.predict_from_file(capfile)


if __name__ == "__main__":
    parser = argparse.ArgumentParser(description="pull and load pre-trained resnet model to classify one image")
    parser.add_argument('--img', type=str, default='cam', help='input image for classification, if this is cam it captures from the PiCamera')
    parser.add_argument('--prefix', type=str, default='squeezenet_v1.1', help='the prefix of the pre-trained model')
    parser.add_argument('--label-name', type=str, default='prob_label', help='the name of the last layer in the loaded network (usually softmax_label)')
    parser.add_argument('--synset', type=str, default='synset.txt', help='the path of the synset for the model')
    parser.add_argument('--params-url', type=str, default=None, help='the (optional) url to pull the network parameter file from')
    parser.add_argument('--symbol-url', type=str, default=None, help='the (optional) url to pull the network symbol JSON from')
    parser.add_argument('--synset-url', type=str, default=None, help='the (optional) url to pull the synset file from')
    args = parser.parse_args()
    mod = ImagenetModel(args.synset, args.prefix, label_names=[args.label_name], params_url=args.params_url, symbol_url=args.symbol_url, synset_url=args.synset_url)
    print "predicting on "+args.img
    if args.img == "cam":
        print mod.predict_from_cam()
    else:
        print mod.predict_from_file(args.img)
下載這個輕量級覺卻高準確率的 ImageNet-trained SqueezeNet V1.1 模型並且使用一張 cat 圖片來執行,請在 Pi 的家目錄下執行以下指令:
wget https://upload.wikimedia.org/wikipedia/commons/b/b9/CyprusShorthair.jpg -O cat.jpg
python load_model.py --img 'cat.jpg' --prefix 'squeezenet_v1.1' --synset 'synset.txt' --params-url 'http://data.mxnet.io/models/imagenet/squeezenet/squeezenet_v1.1-0000.params' --symbol-url 'http://data.mxnet.io/models/imagenet/squeezenet/squeezenet_v1.1-symbol.json' --synset-url 'http://data.mxnet.io/models/imagenet/synset.txt'
輸出結果包含第一個 cat 的標籤,看起來會像是這樣:
[(0.57816696, 'n02123045 tabby, tabby cat'), (0.19830757, 'n02124075 Egyptian cat'), (0.16912524, 'n02325366 wood rabbit, cottontail, cottontail rabbit'), (0.020817872, 'n02123159 tiger cat'), (0.020065691, 'n02326432 hare')]
將相機對準你要分類的目標物用 Raspberry Pi camera 擷取一張影像並且運行這個預先訓練模型,並在 Pi 的家目錄下執行以下指令:
python load_model.py –img ‘cam’ –prefix ‘squeezenet_v1.1’ –synset ‘synset.txt’
你會看到相機擷取圖片後有個很快速預覽。接著針對物件模型運行並且回傳一個建議的標籤。
運行一個在 Pi 上的模型是好的開始。但為了可靠的集中、儲存預測與遠端更新模型,你需要將 Pi 連接到 AWS 雲端。為了做到這個,要在 Pi 上設定 AWS IoT。
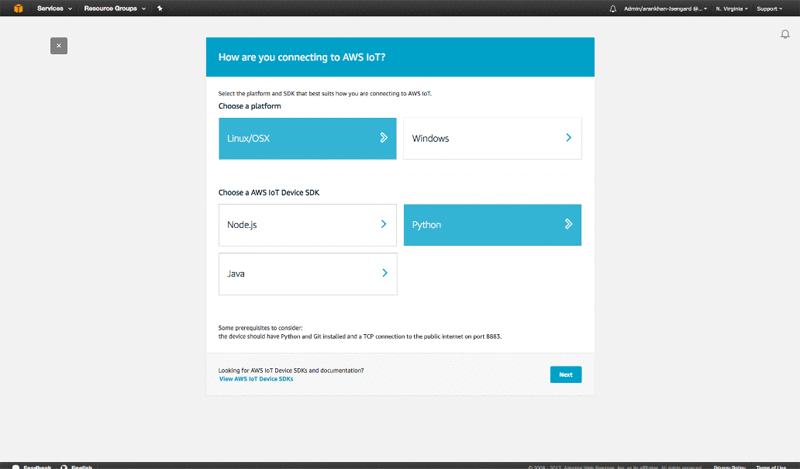
使用 AWS IoT Connect wizard 在這個 AWS IoT Console。針對平台,選擇 Linux/OSX,針對 SDK type,選擇 Python, 接著點選 Next。

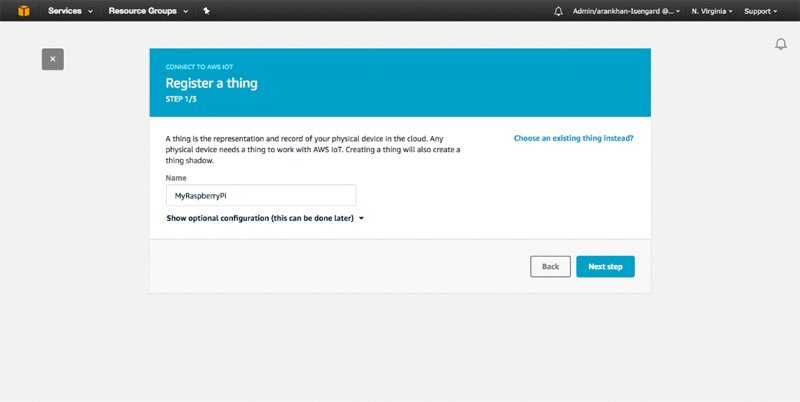
使用 MyRaspberryPi. 來註冊你的裝置。

點選下一步接著連接 kit 下載 connect_device_package.zip 到 Pi。當你解壓縮 connect_device_package.zip 並取出檔案內容放到 Pi 的家目錄,會看到幾個檔案,用來協助裝置透過安全認證方式的連接到 AWS:
請按照下個畫面執行 start.sh script 步驟設定你的裝置與 AWS Cloud 的安全性連接。這個 script 會下載 Symantec Root-CA 憑證到你的 Pi 上與安裝 AWS IoT SDK,讓你可以輕鬆的透過 Python 操作 AWS IoT。這個 script 也能確認 Pi 正與 AWS IoT 交談。
現在你可以使用 AWS IoT 在 Pi 上建立一個服務並且執行一個近乎即時的物件識別並且時時的推送結果到 AWS Cloud。它通時提供模型一個無縫更新模型運行在 Pi 上。
在你的家目錄下,建立一個新的檔案叫 iot_service.py,並且新增下列程式碼:
# iot_service.py
import AWSIoTPythonSDK
from AWSIoTPythonSDK.MQTTLib import AWSIoTMQTTClient
import sys
import logging
import time
import getopt
import json
import load_model

# Custom MQTT message callback
def customCallback(client, userdata, message):
    print("Received a new message: ")
    print(message.payload)
    print("from topic: ")
    print(message.topic)
    print("--------------\n\n")

    if message.topic == "sdk/test/load":
        args = json.loads(message.payload)
        new_model = load_model.ImagenetModel(args['synset'], args['prefix'], label_names=[args['label_name']], params_url=args['params_url'], symbol_url=args['symbol_url'])
        global_model = new_model
    elif message.topic == "sdk/test/switch":
        args = json.loads(message.payload)
        new_model = load_model.ImagenetModel(args['synset'], args['prefix'], label_names=[args['label_name']])
        global_model = new_model

# Usage
usageInfo = """Usage:

Use certificate based mutual authentication:
python iot_server.py -e  -r  -c  -k

Use MQTT over WebSocket:
python iot_server.py -e  -r  -w

Type "python iot_server.py -h" for available options.
"""

# Help info
helpInfo = """-e, --endpoint
    Your AWS IoT custom endpoint
-r, --rootCA
    Root CA file path
-c, --cert
    Certificate file path
-k, --key
    Private key file path
-w, --websocket
    Use MQTT over WebSocket
-h, --help
    Help information
"""

# Read in command-line parameters
useWebsocket = False
host = ""
rootCAPath = ""
certificatePath = ""
privateKeyPath = ""
try:
    opts, args = getopt.getopt(sys.argv[1:], "hwe:k:c:r:", ["help", "endpoint=", "key=","cert=","rootCA=", "websocket"])
    if len(opts) == 0:
        raise getopt.GetoptError("No input parameters!")
    for opt, arg in opts:
        if opt in ("-h", "--help"):
            print(helpInfo)
            exit(0)
        if opt in ("-e", "--endpoint"):
            host = arg
        if opt in ("-r", "--rootCA"):
            rootCAPath = arg
        if opt in ("-c", "--cert"):
            certificatePath = arg
        if opt in ("-k", "--key"):
            privateKeyPath = arg
        if opt in ("-w", "--websocket"):
            useWebsocket = True
except getopt.GetoptError:
    print(usageInfo)
    exit(1)

# Missing configuration notification
missingConfiguration = False
if not host:
    print("Missing '-e' or '--endpoint'")
    missingConfiguration = True
if not rootCAPath:
    print("Missing '-r' or '--rootCA'")
    missingConfiguration = True
if not useWebsocket:
    if not certificatePath:
        print("Missing '-c' or '--cert'")
        missingConfiguration = True
    if not privateKeyPath:
        print("Missing '-k' or '--key'")
        missingConfiguration = True
if missingConfiguration:
    exit(2)


# Configure logging
logger = logging.getLogger("AWSIoTPythonSDK.core")
logger.setLevel(logging.DEBUG)
streamHandler = logging.StreamHandler()
formatter = logging.Formatter('%(asctime)s - %(name)s - %(levelname)s - %(message)s')
streamHandler.setFormatter(formatter)
logger.addHandler(streamHandler)


# Init AWSIoTMQTTClient for publish/subscribe communication with the server
myAWSIoTMQTTClient = None
if useWebsocket:
    myAWSIoTMQTTClient = AWSIoTMQTTClient("basicPubSub", useWebsocket=True)
    myAWSIoTMQTTClient.configureEndpoint(host, 443)
    myAWSIoTMQTTClient.configureCredentials(rootCAPath)
else:
    myAWSIoTMQTTClient = AWSIoTMQTTClient("basicPubSub")
    myAWSIoTMQTTClient.configureEndpoint(host, 8883)
    myAWSIoTMQTTClient.configureCredentials(rootCAPath, privateKeyPath, certificatePath)


# AWSIoTMQTTClient connection configuration
myAWSIoTMQTTClient.configureAutoReconnectBackoffTime(1, 32, 20)
myAWSIoTMQTTClient.configureOfflinePublishQueueing(-1)  # Infinite offline Publish queueing
myAWSIoTMQTTClient.configureDrainingFrequency(2)  # Draining: 2 Hz
myAWSIoTMQTTClient.configureConnectDisconnectTimeout(10)  # 10 sec
myAWSIoTMQTTClient.configureMQTTOperationTimeout(5)  # 5 sec


# Connect and subscribe to AWS IoT
myAWSIoTMQTTClient.connect()
myAWSIoTMQTTClient.subscribe("sdk/test/load", 1, customCallback)
time.sleep(2)


# Tell the server we are alive
myAWSIoTMQTTClient.publish("sdk/test/monitor", "New Message: Starting IoT Server", 0)

global_model = load_model.ImagenetModel('synset.txt', 'squeezenet_v1.1')

while True:
    if global_model is not None:
        predictions = global_model.predict_from_cam()
        print predictions
        myAWSIoTMQTTClient.publish("sdk/test/monitor", "New Prediction: "+str(predictions), 0)
現在在家目錄下用以下指令來執行這個程式:
python iot_service.py -e my-device-endpoint.amazonaws.com -r root-CA.crt -c myraspberrypi.cert.pem -k myraspberrypi.private.key
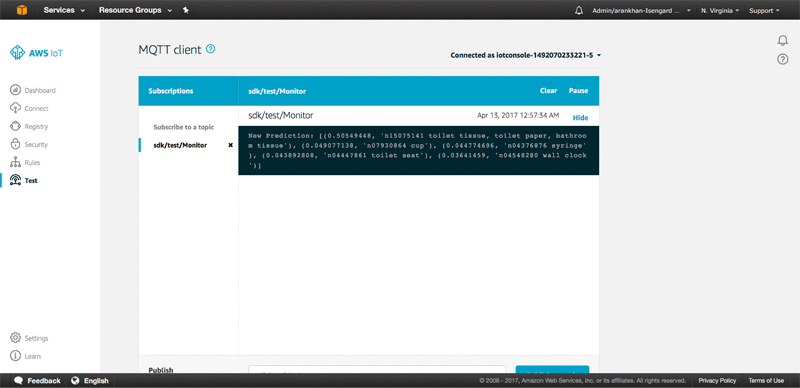
在 AWS IoT Console 選擇測試,接著 subscribe to the sdk/test/monitor topic:

Test 頁面上選擇新主題的名稱,會看見 predictions streaming 即時進入 AWS。即使網路連線過慢或是掉包,AWS IoT 會確保數據不會遺失且讓預測的日誌維持最新。

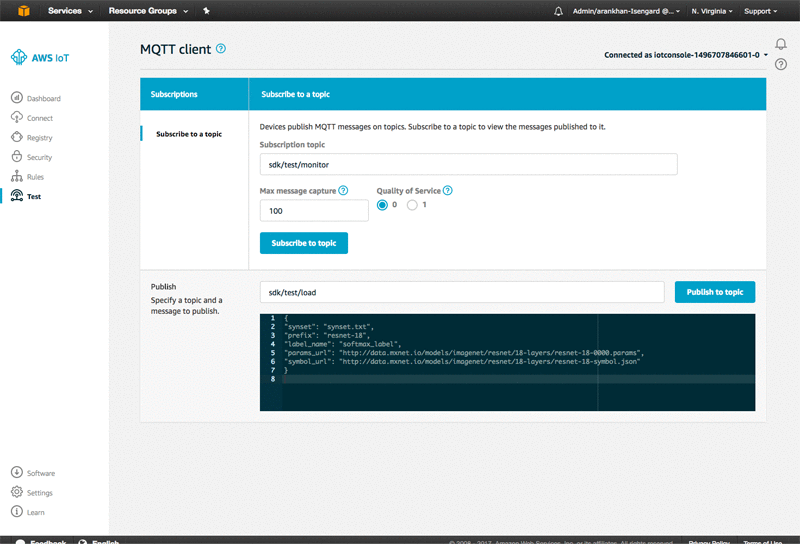
你可以發佈 MQTT 主題用來發送指令給 Pi 用來更新運作中的 MXNet 模型,舉個例子,要更新正在執行在 Pi 上 SqueezeNet model 使其更大、更準確的 ResNet 模型,在 MQTT 客戶端中的 Publish 部份,送出如下的 JSON 到 sdk/test/load topic:
{
"synset": "synset.txt",
"prefix": "resnet-18",
"label_name": "softmax_label",
"params_url": "http://data.mxnet.io/models/imagenet/resnet/18-layers/resnet-18-0000.params",
"symbol_url": "http://data.mxnet.io/models/imagenet/resnet/18-layers/resnet-18-symbol.json"
}
MQTT 客戶端會看到如下:

Pi 會從模型庫下載新的符號與參數檔案,將載入它們來做預測,並且繼續執行新的模型。你不需要下載新的 synset。而你正在使用的兩個新模型已經用 ImageNet task 訓練過,所以你所設定的分類會一樣保持不變。
在 Raspberry Pi 上執行 MXNet 用來預測並透過 AWS IoT 連接 AWS Cloud,你已經完成一個近乎先進的計算機視覺系統。你的系統不需持續依賴在一個高頻寬的影像串流連接或要昂貴的 GPU 伺服器來處理影像。實際上在 Pi 上使用 AWS 和 MXNet,你可以簡單輕鬆地建立一個可靠且低成本的智慧型相機系統。透過這種方法,你可以享有基於雲端模型監控與管理的多數優點。但,你降低了每個月原本必須付出數以百元的支出(伺服器與資料傳輸花費)大約 $60 美元的一次性成本(Pi 和 相機模組的花費)
這個智慧相機系統只是相關應用的一角。你可以開始不斷重複,將他連結到 AWS Cloud 生產服務,透過 AWS IoT 建構一個多個設備間彼此串接,接這使用像是 transfer learning 的方法將預測模型應用於特定的計算機視覺任務。
譯者補充,關於 Apache MXNet 產品有興趣可以參考這篇